
Trees are something that come up quite a bit in software engineering. They’re a very popular and useful data structure that many companies make use of to perform some business operation(s). In this article, we’re going to get a better idea of what trees are. We’ll also see how to implement one in JavaScript.
Key-Concepts
- Tree Data Structure
- Nodes
- Parent-Child Relationship
- Sibilings
- Traversal
Introduction
A tree is a widely used data type that represents a hierarchical tree structure with a set of connected nodes. There are several different types of trees. We’re going to start by looking at the most basic type of tree.
Take a look at the image below.
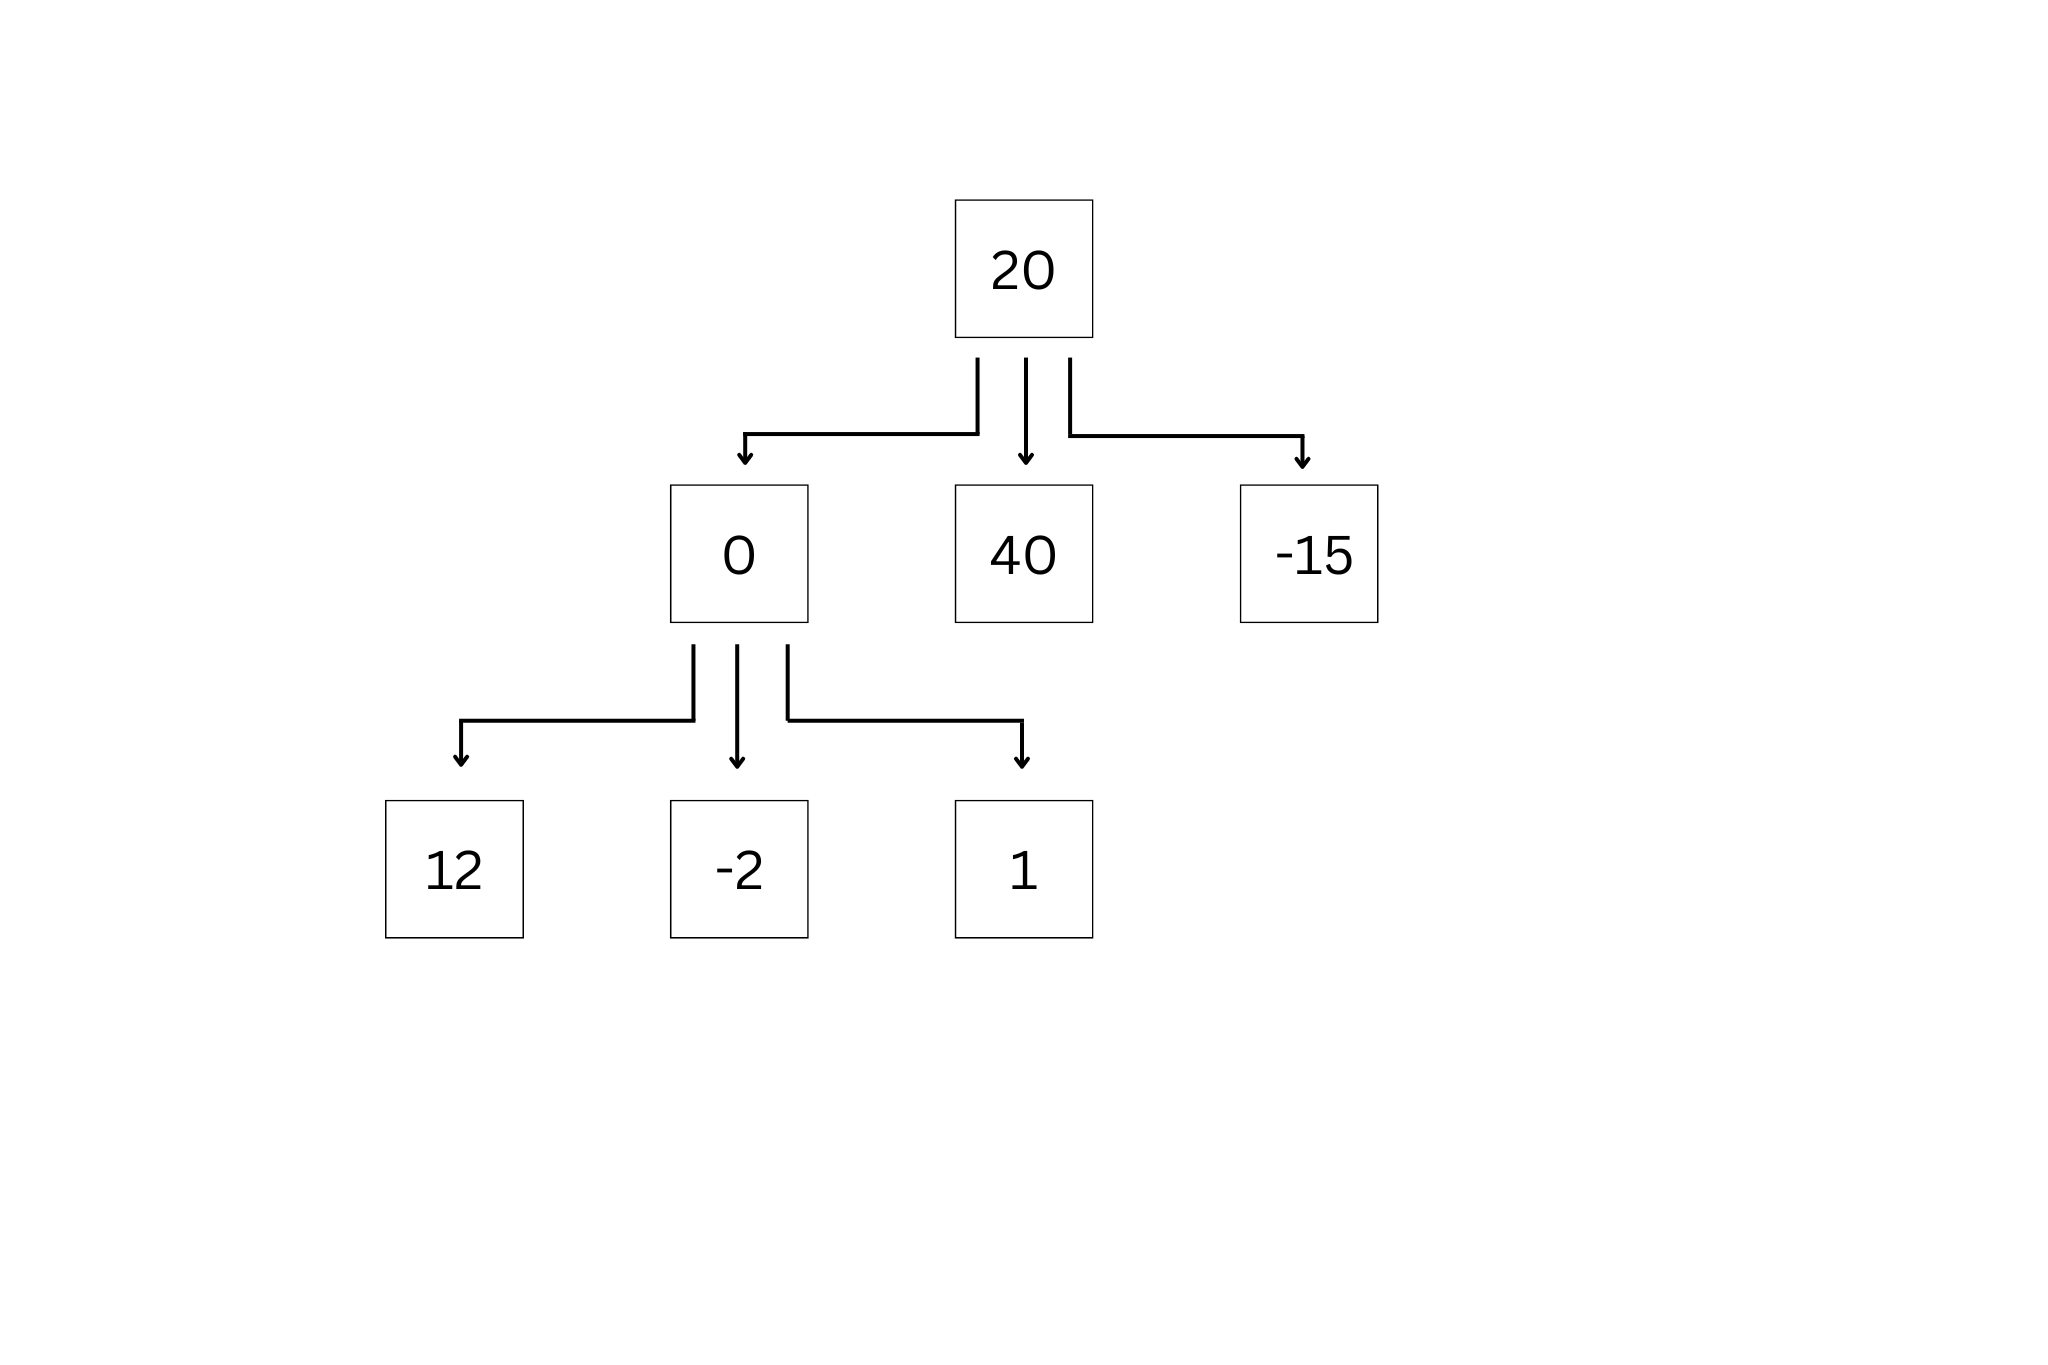
This diagram is a basic representation of a tree data structure.
Let’s label some of the parts in this tree. First, every box in the image is referred to as a node. Each node holds some amount of data, holding a reference to it’s children, which is a node that is directly underneath a given node. In the image above, elements 0, 40, and -15 are children of node 20. Node 20 would be considered the parent of these elements. This is called the parent-child relationship between the nodes on the tree.
Nodes can also be referred to as siblings. For example, look at 12 and -2 in the image above. These two nodes are siblings of each other. Likewise, nodes -2 and 1 are also siblings. However, nodes must have the same parent node to be considered siblings.
The diagram contains numbers, but in a practical use, the tree could contain any data we’d want it to, including strings, arrays, objects, or a combination of these.
Tree Traversal
When dealing with trees in an interview setting, one of the most common questions you will be asked is to traverse the tree. This simply means to search through the tree (that is, iterate through it).
We’ll explore two different algorithms which allow us to iterate through a tree. The first one is called breadth-first search. The second is depth-first search. Let’s explore them.
Breadth-First Search
From Wikipedia: Breadth-first search (BFS) is an algorithm for searching a tree data structure for a node that satisfies a given property.
With breadth-first search, we’re going to iterate at each level of the tree from left to right. Per the image above, that means we’ll start at the very top of the tree (20), then go down to the next node, 0, and work our way to the right, 40, -15. After reaching -15, we’d go down to the next level, and again, working from left to right: 12, -2, 1.
Depth-First Search
From Wikipedia: Depth-first search (DFS) is an algorithm for traversing or searching tree or graph data structures.
With depth-first search, we start at the first node (from the image directly above, that would be 20), then work our way down to 0, and then 12. After hitting 12, we’d then go back up to 0, then to -2, back to 0, and then down to 1.
We know this might sound confusing, so here’s an animated version of depth-first search in action:
Creating a Node Class
We’re going to start implementing some code for our tree data structure. First, we need to create a node class. Remember: a node carries references to all the child nodes underneath it, and we usually make use of an array to store all of those references.
Let’s begin creating the node class.
Instructions
- The constructor should accept an argument that gets assigned to the data property and initializes an empty array for storing children.
- The node class should have methods
addandremove.
class Node {
  constructor(data) {
    this.data = data;
    this.children = [];
  }

  add(data) {
    this.children.push(new Node(data));
  }
  remove(data) {
    this.children = this.children.filter((node) => {
      return node.data !== data;
    });
  }
}
Now that our Node class is completed, we can start focusing on implementing the actual tree. But before we do that, let’s examine our node class. Note that data can be anything – a string, number, array, or whatever. Next, we’re going to assign this.children to store our children properties.
add(data)- Given some data, create a new node, add it to the current node’s children array.remove(data)- Given some data, look at each child of the current node and remove any node withdata === data.
Creating the Tree class
Now that the Node class is implemented, we can start creating the tree class. Within the contructor, we’re going to assign a root property, which will contain a reference to the head of the tree. We’re also going to want to include two traverse methods – those of which we discussed above: Breadth-First Search and Depth-First Search.
Instructions
- Create a tree class. The tree constructor should initialize a
rootproperty to null. - Implement
traverseBFSandtraverseDFSon the tree class.
class Tree {
  constructor() {
    this.root = null;
  }

  traverseBF(fn) {
    const arr = [this.root];
    while (arr.length) {
      const node = arr.shift();

      arr.push(...node.children);
      fn(node);
    }
  }

  traverseDF(fn) {
    const arr = [this.root];
    while (arr.length) {
      const node = arr.shift();

      arr.unshift(...node.children);
      fn(node);
    }
  }
}
The first thing you are going to do is set this.root = null in the constructor. It’s the only line of code that will be contained within the constructor. We’re declaring this because when we first create a tree, it’s going to start off with an empty root property.
The root node is going to be the root node that we just created, const Node = new Node(1).
Complete implementation
// Node class
class Node {
  constructor(data) {
    this.data = data;
    this.children = [];
  }

  add(data) {
    this.children.push(new Node(data));
  }

  remove(data) {
    this.children = this.children.filter((node) => {
      return node.data !== data;
    });
  }
}

// Tree class
class Tree {
  constructor() {
    this.root = null;
  }

  traverseBF(fn) {
    const arr = [this.root];
    while (arr.length) {
      const node = arr.shift();

      arr.push(...node.children);
      fn(node);
    }
  }

  traverseDF(fn) {
    const arr = [this.root];
    while (arr.length) {
      const node = arr.shift();

      arr.unshift(...node.children);
      fn(node);
    }
  }
}
Example of using a tree
const node = new Node(1);
const tree = new Tree();
tree.root = node;
Conclusion
And there we have it! A tree implemented in JavaScript. I have covered quite a bit in this short article, I hope it proves to be useful for you.
Have a question? Post it in the comments below!
Topics
Discussion (Loading...)
Join the Discussion
Sign in to share your thoughts and engage with the JavaScript Today community.