In this tutorial, we will show you how to build a real-time chat application using React and Vite,as well as a simple Node backend. We will use SocketIO for real-time communication and Tailwind CSS for styling.
(Full source code down below!)
Setting Up the Project
First, let’s create a new folder, real-time-chat. In this folder, we’ll setup a React project using Vite.
npm create vite@latest client
cd client
npm install
Note: Go through the installation by selecting “React” and then “JavaScript”.
Installing Dependencies
For this project, we’ll be using various libraries, including socket.io and tailwindCSS. Run the following in the client folder you just set up:
npm install socket.io-client
npm install -D tailwindcss postcss autoprefixer
npx tailwindcss init -p
Configuring Tailwind CSS
Next, lets configure Tailwind CSS. The last command you ran above should have generated a tailwind.config.js file. Include the following:
/** @type {import('tailwindcss').Config} */
module.exports = {
  content: ["./index.html", "./src/**/*.{js,ts,jsx,tsx}"],
  theme: {
    extend: {},
  },
  plugins: [],
};
Next, we’ll want to edit the src/index.css file, replacing everything with the following:
@tailwind base;
@tailwind components;
@tailwind utilities;
Now the project is ready to use Tailwind.
You can also delete App.css, and the /assets folder, as we won’t be using them. However, you’ll need to remember to go to App.jsx and remove those imports.
Setting Up the Server
We need a simple server to handle the WebSocket connections. Let’s set up an Express server with SocketIO.
Create a new directory in the real-time-chat folder. We’ll call it server.
mkdir server
cd server
npm init -y
npm install express socket.io
Next, create an index.js file in the server directory and add the following code:
const express = require("express");
const http = require("http");
const { Server } = require("socket.io");

const app = express();
const server = http.createServer(app);
const io = new Server(server, {
  cors: {
    origin: "http://localhost:5173",
    methods: ["GET", "POST"],
  },
});

io.on("connection", (socket) => {
  console.log("a user connected");

  socket.on("chat message", (msg) => {
    io.emit("chat message", msg);
  });

  socket.on("disconnect", () => {
    console.log("user disconnected");
  });
});

server.listen(3000, () => {
  console.log("listening on *:3000");
});
Start the server by typing node index.js in the terminal.
Note: Restarting the server every time you make a change can get annoying quickly. If you’d like, you can install nodemon by typing npm i --save-dev nodemon. Now, in package.json, you can add a “start”, and “dev” command under “scripts”, like so:
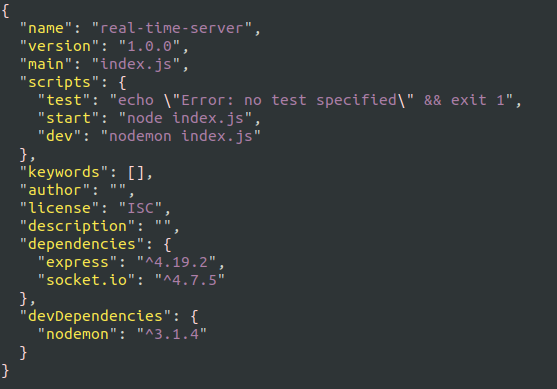
Now you can type npm run dev, and as you make changes in index.js, the server will automatically restart for you. Although, for this article, we are finished with the server – this is just a tip if you plan on extending the functionality of this application.
Building the Frontend
Now, let’s build the frontend of our chat application, starting with the emoji picker, of which we’ll be importing.
Let’s install the emoji-picker-react library:
npm i emoji-picker-react
Now we’re free to use it:
/* A blank page with an emoji selector */
import Picker from "emoji-picker-react";

function App() {
  return (
    <div>
      <Picker />
    </div>
  );
}

export default App;
Although, that’s just an example, and not at all what our App.jsx is going to look like. In fact, we don’t want the emoji to be displayed like that at all times, but a user should be able to open and close it.
So, in src, let’s create a component, EmojiPicker.jsx. In this file, add the following:
import React, { useState, useRef, useEffect } from "react";
import Picker from "emoji-picker-react";

const EmojiPicker = ({ onEmojiClick }) => {
  const [showPicker, setShowPicker] = useState(false);
  const pickerRef = useRef(null);

  const togglePicker = () => {
    setShowPicker(!showPicker);
  };

  const handleClickOutside = (event) => {
    if (pickerRef.current && !pickerRef.current.contains(event.target)) {
      setShowPicker(false);
    }
  };

  useEffect(() => {
    document.addEventListener("mousedown", handleClickOutside);
    return () => {
      document.removeEventListener("mousedown", handleClickOutside);
    };
  }, []);

  return (
    <div className="relative" ref={pickerRef}>
      <button
        type="button"
        className="p-2 bg-gray-200 rounded-full hover:bg-gray-300 focus:outline-none"
        onClick={togglePicker}
      >
        😀
      </button>
      {showPicker && (
        <div className="absolute bottom-12 right-0 z-10">
          <Picker onEmojiClick={onEmojiClick} />
        </div>
      )}
    </div>
  );
};

export default EmojiPicker;
Setting up the Chat components
Our application will essentially contain three components: ChatBox.jsx, ChatMessages.jsx, and ChatInput.jsx.
Looking at the component names, you might be able to get an idea of what each of them does. ChatBox.jsx will contain everything, it is the parent component. ChatMessages.jsx will contain the logic for displaying the messages that will be handles with ChatInput.jsx. Create these three files in the src folder.
So, let’s start by defining ChatBox.jsx:
import React from "react";
import { ChatMessages } from "./ChatMessages";
import { ChatInput } from "./ChatInput";

const ChatBox = () => {
  return (
    <>
      <ChatMessages />
      <ChatInput />
    </>
  );
};

export default ChatBox;
Currently, these two components don’t contain any code, so you’ll surely see some errors coming from Vite.
No worries, paste the following code into ChatMessages.jsx:
import React, { useEffect, useState, useRef } from "react";
import { io } from "socket.io-client";

const socket = io("http://localhost:3000");

export const ChatMessages = () => {
  const [messages, setMessages] = useState([]);
  const messagesEndRef = useRef(null);

  useEffect(() => {
    socket.on("chat message", (msg) => {
      setMessages((prevMessages) => [...prevMessages, msg]);
    });

    return () => {
      socket.off("chat message");
    };
  }, []);

  useEffect(() => {
    if (messagesEndRef.current) {
      messagesEndRef.current.scrollIntoView({ behavior: "smooth" });
    }
  }, [messages]);

  return (
    <div className="h-64 overflow-y-auto mb-4 p-4 bg-gray-100 rounded-lg">
      {messages.map((msg, index) => (
        <div
          key={index}
          className={`p-2 mb-2 rounded-lg text-left ${
            index % 2 === 0 ? "bg-blue-100" : "bg-indigo-300"
          }`}
        >
          {msg}
        </div>
      ))}
      <div ref={messagesEndRef} />
    </div>
  );
};
There is quite a lot going on in this component, and we can probably make another component out of this one, but for the sake of this article, we’re just going to roll with it. The first useEffect hook in the code above sets up a side effect in the component that listens for incoming chat messages from the WebSocket connection, updating the component’s state, defined with const [messages, setMessages] = useState([]), with the new messages.
The second useEffect hook essentially just scrolls to the current message, based on the useRef() hook. The code within return () now just essentially displays the messages sent.
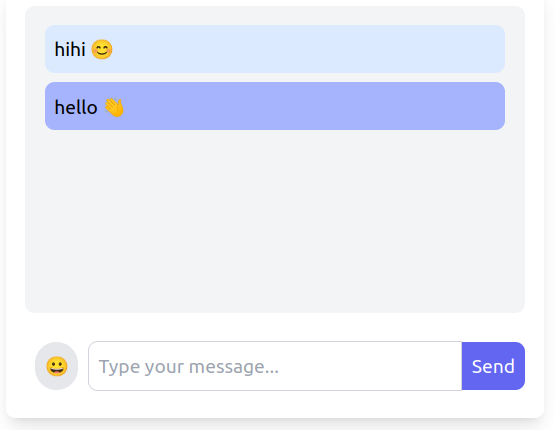
At this point, if you were to remove the call to <ChatInput /> from the ChatBox component, you should see something like this:
It’s completely ready to accept some messages and display them, but now we need to build the ChatInput compnent.
import React, { useState } from "react";
import { io } from "socket.io-client";
import EmojiPicker from "./EmojiPicker";

const socket = io("http://localhost:3000");

export const ChatInput = () => {
  const [message, setMessage] = useState("");

  const sendMessage = (e) => {
    e.preventDefault();
    if (message.trim()) {
      socket.emit("chat message", message);
      setMessage("");
    }
  };

  const handleEmojiClick = (emoji, event) => {
    setMessage((prevMessage) => prevMessage + emoji.emoji);
  };

  return (
    <form onSubmit={sendMessage} className="flex items-center">
      <div className="m-2">
        <EmojiPicker onEmojiClick={handleEmojiClick} />
      </div>
      <input
        type="text"
        value={message}
        onChange={(e) => setMessage(e.target.value)}
        className="flex-grow p-2 border border-gray-300 rounded-l-lg focus:outline-none focus:ring-2 focus:ring-indigo-500"
        placeholder="Type your message..."
      />
      <button
        type="submit"
        className="p-2 bg-indigo-500 text-white rounded-r-lg hover:bg-indigo-600 focus:outline-none focus:ring-2 focus:ring-indigo-500"
      >
        Send
      </button>
    </form>
  );
};
This component handles the submission of messages, as well as contains the <EmojiPicker /> component, which is a nice addition to the web based chat application.
The last step is to import the Chat.jsx component into App.jsx,
import React from "react";
import Chat from "./Chat";

function App() {
  return (
    <div className="flex flex-col items-center justify-center h-screen">
      <div className="w-full max-w-md p-4 bg-white shadow-lg rounded-lg">
        <Chat />
      </div>
    </div>
  );
}

export default App;
By now, you should have a functioning chat application, of which you can test by opening open another browser tab, and sending messages between the two.
Source Code
Conclusion
You now have a pretty neat real-time chat application, eh?
But… it can be better, right? Like, what if you wanted to unsend or edit a message? The styling can probably be improved a bit too. You can create a full-page chat application, or keep this as a mini component for a larger application. The choice is ultimately up to you!
Although, go ahead and practice your React skills by updating this mini application to have features you’d like to see. Share your results in the comments below! :)
Topics
Discussion (Loading...)
Join the Discussion
Sign in to share your thoughts and engage with the JavaScript Today community.

